
To screenshot on a Lenovo laptop, press the “PrtSc” button on your keyboard and then paste the screenshot into an image editor or document program.
Lenovo laptops offer a simple and efficient way to capture screenshots directly from your device.
Whether you need to save an image, capture an error message, or share important information, taking a screenshot on your Lenovo laptop is a breeze.
In this guide, we’ll walk you through the quick and easy steps to capture screenshots on your Lenovo laptop.
By following these instructions, you’ll be able to quickly share and save screenshots without any hassle.
So, let’s dive in and learn how to take a screenshot on your Lenovo laptop.
The Importance Of Knowing How To Screenshot On A Lenovo Laptop
In today’s digital age, the ability to capture and share information quickly and efficiently is crucial.
Whether you are a student, a professional, or simply someone who uses a laptop regularly, knowing how to take screenshots on a Lenovo laptop is an essential skill to have.
Not only does it make communication and troubleshooting easier, but it also offers specific benefits that can enhance your overall productivity and efficiency.
Screenshots as a Useful Tool for Communication and Troubleshooting
One of the primary reasons why knowing how to take screenshots on a Lenovo laptop is important is because it serves as a useful tool for communication and troubleshooting.
With just a few simple clicks, you can capture and share important information or error messages with others.
Whether you need to send a screenshot of a website design to a client or provide tech support by showing a step-by-step guide, screenshots can effectively convey information without the need for lengthy explanations.
The Specific Benefits of Taking Screenshots on a Lenovo Laptop
Taking screenshots on a Lenovo laptop offers a wide range of benefits tailored to the specific needs of its users. Let’s explore some of these benefits:
- Documentation: Screenshots serve as visual documentation, allowing you to capture important information that may not be easily retrievable later. Whether it’s a temporary message, an error code, or a specific configuration setting, screenshots provide a reference point that you can revisit whenever needed.
- Collaboration: In a collaborative setting, screenshots are invaluable for sharing ideas, providing feedback, or seeking assistance. You can easily highlight or mark up specific areas of a screenshot to draw attention to particular points or make suggestions.
- Troubleshooting and Tech Support: If you encounter an issue with your Lenovo laptop, taking a screenshot can provide valuable evidence when seeking technical support. Instead of trying to describe the problem verbally, a screenshot can help technicians identify the issue faster and offer more accurate solutions.
- Training and Education: Screenshots are excellent tools for creating tutorials, instructional materials, or training resources. You can capture each step of a process or highlight specific features and functions, making it easier for others to understand and follow your instructions.
- Archiving and Organization: Screenshots can be used to document and organize important information, such as web pages, software settings, or even receipts for online purchases. By organizing your screenshots into folders or categories, you can quickly retrieve them whenever needed.
In conclusion, knowing how to take screenshots on a Lenovo laptop is not just a basic computer skill, but a valuable tool that can enhance your productivity, facilitate communication, and streamline troubleshooting.
Taking advantage of the specific benefits offered by screenshots on a Lenovo laptop can save you time, improve collaborations, and provide a visual reference that can make your digital life simpler and more efficient.
Credit: m.youtube.com
Different Ways To Take Screenshots On A Lenovo Laptop
Taking screenshots on a Lenovo laptop is a useful skill that can come in handy for various tasks, such as capturing an important document, saving a memorable moment, or troubleshooting technical issues.
Thankfully, Lenovo laptops offer multiple methods to capture screenshots, including using the Print Screen (PrtSc) button, utilizing the Windows built-in snipping tool, or installing third-party screenshot software.
In this article, we will explore each of these options in detail, so you can choose the method that works best for you.
Using the Print Screen (PrtSc) button
The Print Screen button, often abbreviated as PrtSc, is a key on your Lenovo laptop’s keyboard that allows you to take screenshots quickly.
This button has several basic functions:
- Capture the entire screen
- Capture a specific window
How to capture the entire screen using the Print Screen button
To capture the entire screen using the Print Screen button:
- Ensure that the screen you want to capture is in focus.
- Locate the Print Screen button on your Lenovo laptop’s keyboard.
- Press the Print Screen button once.
- The screenshot is now saved to your clipboard.
- Open an image editing software or any other program that supports image pasting.
- Paste the screenshot (Ctrl + V or right-click and select Paste) to save it as an image file.
How to capture a specific window using the Print Screen button
If you only want to capture a specific window rather than the entire screen, follow these steps:
- Open the window you want to capture.
- Ensure that the window is in focus.
- Locate the Alt key on your Lenovo laptop’s keyboard.
- Press and hold the Alt key.
- While holding the Alt key, press the Print Screen button once.
- The screenshot of the specific window is now saved to your clipboard.
- Open an image editing software or any other program that supports image pasting.
- Paste the screenshot (Ctrl + V or right-click and select Paste) to save it as an image file.
Utilizing Windows built-in snipping tool
The Windows operating system offers a powerful built-in tool called the Snipping Tool, which allows you to capture screenshots with more versatility and precision. There are various types of snips you can take:
- Free-form snip
- Rectangular snip
- Full-screen snip
The advantages of using the snipping tool over the Print Screen button
While the Print Screen button method is quick and effective, the Snipping Tool provides additional benefits:
- Ability to capture specific regions or shapes of the screen
- Option to annotate and highlight captured screenshots
- Direct saving and sharing capabilities
How to capture free-form, rectangular, and full-screen snips
To use the Snipping Tool to take various types of snips:
- Click on the Start menu or press the Windows key.
- Type “Snipping Tool” in the search bar and open the application.
- In the Snipping Tool window, select the desired snip type from the toolbar (Free-form, Rectangular, or Full-screen).
- Click and drag your mouse to capture the desired screen area.
- Release the mouse button to finalize the snip.
- Save the snip by clicking on the Save button in the Snipping Tool window.
Installing third-party screenshot software
If you require more advanced features or additional customization options for your screenshots, installing third-party screenshot software is an excellent option.
Here are some popular third-party screenshot tools you can consider:
- Lightshot
- Snagit
- Greenshot
Step-by-step guide on installing and using a third-party screenshot software
Follow these steps to install and use a third-party screenshot software:
- Visit the official website of the desired third-party screenshot software.
- Download the installation file compatible with your Lenovo laptop’s operating system.
- Launch the downloaded file and follow the on-screen instructions to install the software.
- Once installed, open the third-party screenshot software.
- Explore the various features and customization options available.
- Capture screenshots using the designated key combination or through the software’s interface.
- Edit, annotate, save, and share your screenshots using the software’s built-in tools.
By familiarizing yourself with these different methods to take screenshots on your Lenovo laptop, you can effortlessly capture important information, share visually rich content, or troubleshoot technical problems.
Choose the method that suits your needs and start capturing those memorable moments or valuable information with ease.
Tips And Tricks For Taking Screenshots On A Lenovo Laptop
Taking screenshots can be a handy way to save and share important information on your Lenovo laptop.
Whether you need to capture an error message, save an image, or document a webpage, knowing the best tips and tricks for taking screenshots on your Lenovo laptop can save you time and frustration.
In this article, we will explore different methods to customize screenshot settings, adjust the default save location, change the file format, use keyboard shortcuts, enable and disable shortcuts, and even annotate and edit your screenshots using recommended tools.
Customizing screenshot settings on a Lenovo laptop
Lenovo laptops offer the flexibility to customize screenshot settings according to your preferences. To access these settings:
- Click on the Windows icon in the bottom left corner of your screen to open the Start Menu.
- Select “Settings,” then choose “Ease of Access.”
- Under the “Interaction” section, click on “Keyboard” from the left-hand menu.
- Scroll down and find the “Print Screen shortcut” setting.
- Click on the toggle switch to turn it on or off, depending on your preference.
Adjusting the default screenshot save location
By default, Lenovo laptops save screenshots in the “Pictures” folder. However, you can easily change this location to suit your needs:
- Press the “Windows” key and “E” key simultaneously to open File Explorer.
- Navigate to the desired folder where you want to save your screenshots.
- Right-click on the folder and select “Properties” from the drop-down menu.
- In the “Location” tab, click on “Move…” and choose the new destination for your screenshots.
- Click “Apply” and then “OK” to save the changes.
Changing the screenshot file format
If you want to change the default file format (which is usually PNG) for your screenshots on a Lenovo laptop, follow these steps:
- Access the “Settings” menu by clicking on the Windows icon and selecting “Settings.”
- Choose “System” and then click on “Display.”
- Scroll down and click on “Advanced display settings.”
- Under “Resolution,” click on “Advanced settings.”
- Select the “Monitor” tab and click on “Screen refresh rate.”
- In the new window, click on “Adapter” and then “List all modes.”
- Choose a different resolution and refresh rate combination that matches your desired file format.
- Click “OK” to save the changes.
Using keyboard shortcuts for faster screenshots
Keyboard shortcuts can be a time-saving way to take screenshots on your Lenovo laptop.
Here are some common shortcuts:
| Shortcut | Description |
|---|---|
Ctrl + PrtSc | Captures the entire screen and saves it to the clipboard. |
Alt + PrtSc | Captures only the active window and saves it to the clipboard. |
Windows key + PrtSc | Captures the entire screen and saves it directly to the “Pictures” folder. |
Shortcut combinations for different types of screenshots
Depending on your needs, you can use different shortcut combinations to capture specific types of screenshots:
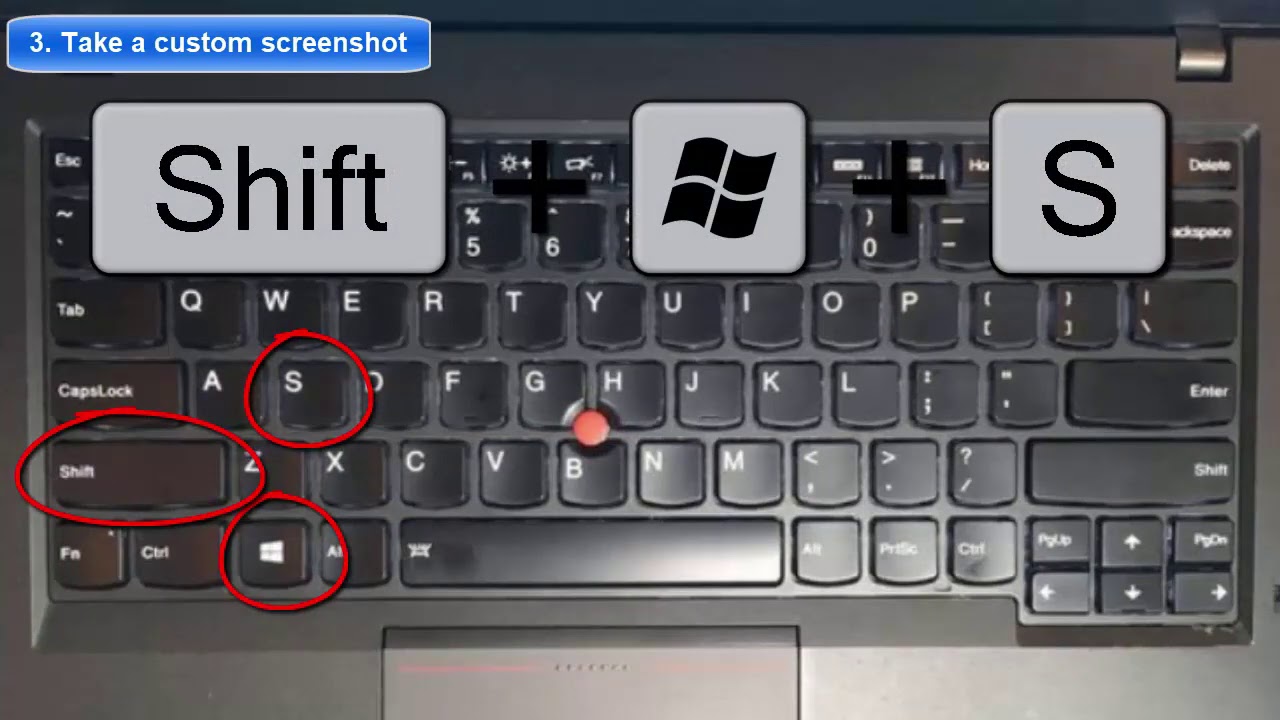
Windows key + Shift + S: This shortcut allows you to capture a specific portion of the screen and copy it to the clipboard. You can then paste it into an application or document.Windows key + G: If you want to record a game clip, this shortcut opens the Game Bar where you can capture screenshots or record gameplay.
How to enable and disable keyboard shortcuts on a Lenovo laptop
If you want to enable or disable specific keyboard shortcuts on your Lenovo laptop, follow these steps:
- Access the “Settings” menu by clicking on the Windows icon and selecting “Settings.”
- Choose “Ease of Access” and then click on “Keyboard.”
- Scroll down to find the “Use the PrtScn button to open screen snipping” toggle switch.
- To enable the shortcut, click on the toggle switch to turn it on. To disable it, click on the toggle switch to turn it off.
Annotating and editing screenshots
After capturing a screenshot on your Lenovo laptop, you might want to annotate or edit it for better communication.
Here are some recommended tools:
- Snip & Sketch: This built-in Windows tool allows you to annotate, crop, and highlight areas on your screenshots. You can access it by pressing the “Windows” key and the “Shift” key together, then typing “Snip & Sketch” and selecting the app from the search results.
- Adobe Photoshop: If you need more advanced editing features, Adobe Photoshop provides extensive capabilities for manipulating and enhancing screenshots. However, it requires a separate installation.
With these tips and tricks at your disposal, you can easily take screenshots on your Lenovo laptop and customize them according to your needs.
Whether you want to save important information, document errors, or share visuals with others, capturing screenshots has never been easier.
FAQs of How to Screenshot on a Lenovo Laptop
What Is The Shortcut Key For Screenshot On Lenovo Laptop?
The shortcut key for taking a screenshot on a Lenovo laptop is “Fn + PrtScn. “
How Do You Take Screenshots On Laptops?
To take screenshots on laptops, press the “Print Screen” or “PrtScn” key to capture the entire screen. To capture a specific window, press “Alt + Print Screen. ” Use the “Windows Key + Shift + S” shortcut to select a specific area.
How Do I Take A Screenshot On My Lenovo Laptop?
To take a screenshot on your Lenovo laptop, press the “PrtScn” or “Print Screen” key located in the top right corner of your keyboard. This will capture a full screenshot of your entire screen. You can then paste it into an image editing software or document to save or share it.
How Do I Capture A Specific Window On My Lenovo Laptop?
To capture a specific window on your Lenovo laptop, press the “Alt” key + “PrtScn” or “Print Screen” key. This will capture only the active window instead of the entire screen. You can then paste it into an image editing software or document to save or share it.
Conclusion
Capturing screenshots on a Lenovo laptop is a simple and essential skill that can greatly enhance your productivity.
Whether you need to save important information, share visuals with colleagues, or troubleshoot technical issues, knowing how to screenshot is a valuable tool in your arsenal.
By using the Print Screen key, the Snipping Tool, or the Windows + Shift + S shortcut, you can easily capture, save, and share screenshots without any hassle.
Remember to consider the specific requirements of your Lenovo laptop model and operating system, as well as any additional software options available to you.
With these methods at your fingertips, you’ll be able to effortlessly navigate the world of screenshots and take advantage of this powerful feature on your Lenovo laptop. Stay productive, stay efficient, and be happy screenshotting!