To unlock the keyboard on your Dell laptop running Windows 10, simply press the “Num Lock” key. Now you can use your keyboard as usual.
If you’re unable to use your keyboard on your Dell laptop running Windows 10, it can be quite frustrating.
Whether it’s due to a software glitch or accidentally activating a setting, this issue can hinder your productivity. Fortunately, solving this problem is usually as simple as pressing a key.
We’ll explore the steps to unlock your keyboard on a Dell laptop running Windows 10. By following these instructions, you’ll be able to resume typing and using your keyboard without any issues.
Keyboard Locked Issue on Dell Laptop
Are you facing a keyboard-locked issue on your Dell laptop running on Windows 10? Having a locked keyboard can be frustrating and hinder your productivity. There can be several reasons why your Dell laptop keyboard is locked.
In this blog post, we will discuss the possible reasons and troubleshooting steps to unlock the keyboard.
Reasons for the keyboard being locked
Before we proceed with troubleshooting, let’s take a look at some common reasons why your Dell laptop keyboard may become locked:
| Reason | Description |
| Dell keyboard shortcut | Accidentally triggering a keyboard shortcut that locks the keyboard. |
| External software conflict | Conflicting software or drivers that may inadvertently lock the keyboard. |
| Hardware issue | A faulty keyboard or a loose connection can cause the keyboard to lock. |
Troubleshooting steps to unlock the keyboard
If your Dell laptop keyboard is locked, try the following troubleshooting steps to unlock it:
- Check for physical issues: Ensure there is no debris or press sticky keys on your keyboard. Clean it gently using compressed air or a soft brush.
- Restart your laptop: Restarting your Dell laptop can resolve minor software glitches and unlock the keyboard.
- Check for keyboard shortcuts: Press the “Ctrl + Alt + Del” or “Windows + Space” keys to check if any keyboard shortcuts were triggered that may have locked the keyboard.
- Update keyboard drivers: Open the Device Manager, expand the “Keyboards” category, right-click on your keyboard driver, and select “Update driver.” Follow the on-screen instructions to update the driver to the latest version.
- Disable Filter Keys: Open the Control Panel, click on “Ease of Access,” and select “Change how your keyboard works.” Uncheck the “Turn on Filter Keys” option and click “Apply” to disable Filter Keys, which can cause the keyboard to lock.
- Uninstall conflicting software: If you recently installed any software that may be conflicting with the keyboard, uninstall it from the Control Panel or use the manufacturer’s uninstaller.
Following these troubleshooting steps should help you unlock the keyboard on your Dell laptop running Windows 10. If the issue persists, it is advisable to contact Dell support for further assistance. Happy typing!
Common Causes Of Keyboard Lock
Accidental keystrokes leading to keyboard lock.
One of the common causes of keyboard lock on Dell laptops running Windows 10 is accidental keystrokes.
It’s quite easy to unintentionally trigger a keyboard lock feature, especially when you’re working quickly or not familiar with the keyboard shortcuts.
When you accidentally press certain combinations of keys, your keyboard might become locked, leaving you unable to type or use any of the keys.
This can be frustrating, but the good news is that it’s usually easy to resolve by knowing the correct keystrokes to unlock the keyboard.
Issues with the keyboard driver.
Another reason for keyboard lock on Dell laptops is problems with the keyboard driver. The driver is the software that allows your operating system to communicate with the hardware, including the keyboard.
If the keyboard driver gets corrupted, outdated, or incompatible with your Dell laptop’s Windows 10 version, it can lead to a keyboard lock. In such cases, you may not be able to input any text or command through the keyboard until the issue is fixed.
Ensuring that your keyboard driver is up-to-date and compatible with your Windows 10 version is crucial to prevent keyboard lock issues.
Incorrect keyboard settings.
Incorrect keyboard settings can also cause keyboard lock on Dell laptops running Windows 10. Sometimes, the keyboard layout or input language settings get changed mistakenly or due to a system update, leading to unexpected keyboard behavior.
When the keyboard settings are incorrect, you may experience keyboard lock issues, where certain keys may not work, or the keyboard becomes completely unresponsive.
Checking and correcting the keyboard settings can help resolve the issue and unlock the keyboard on your Dell laptop.
Step-By-Step Guide To Unlock Keyboard
Are you struggling with a locked keyboard on your Dell laptop running Windows 10? Don’t worry, we’ve got you covered! In this step-by-step guide, we will walk you through the process of unlocking your keyboard and getting it back to its fully functional state.
Follow these simple instructions to regain control of your keyboard and continue working seamlessly on your Dell laptop.
Restart the laptop
The first step in unlocking your keyboard is to restart your laptop. This simple yet effective solution often helps resolve minor software glitches that may be causing the keyboard to lock up. To restart your Dell laptop, follow these simple steps:
- Save any ongoing work and close all open applications.
- Click on the “Start” button in the bottom left corner of your screen.
- From the Start menu, click on the “Power” button.
- Select “Restart” from the drop-down menu.
- Wait for your laptop to fully restart and check if the keyboard is now unlocked.
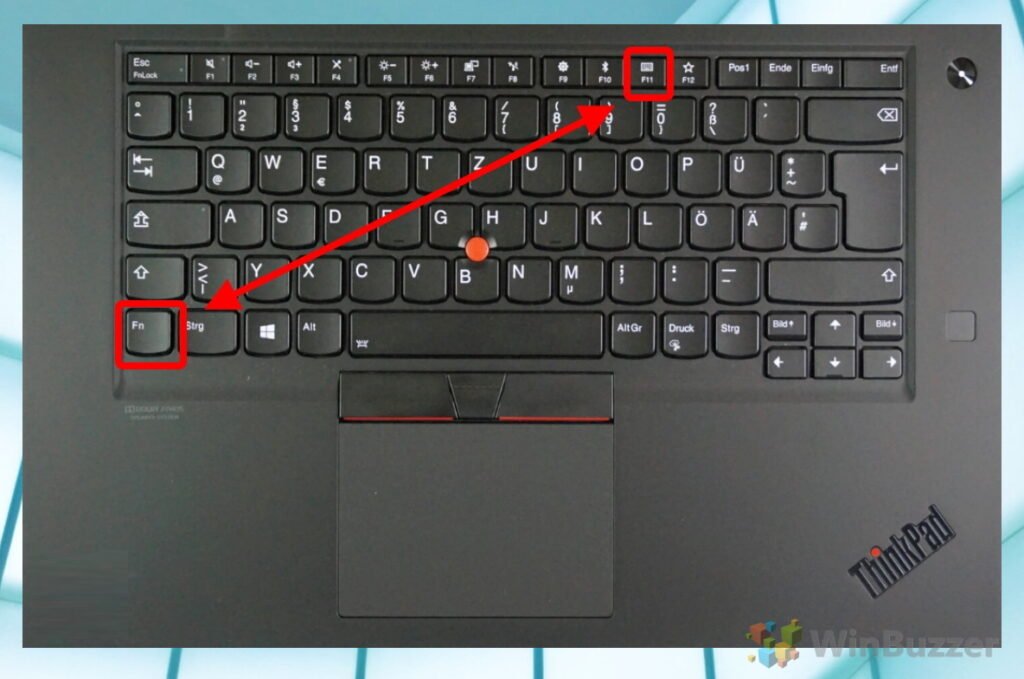
Unlock the keyboard using the function key
If restarting the laptop didn’t unlock the keyboard, you can try using the function key to manually unlock it.
Many Dell laptops have a dedicated key or a combination of keys that can be used to lock or unlock the keyboard. Follow these steps to unlock your keyboard using the function key:
- Press the “Fn” key located at the bottom left corner of your keyboard.
- While holding down the “Fn” key, locate the key with the symbol of a lock or padlock (usually labeled “F1”, “F2”, or “F12”).
- Press the designated key with the lock or padlock symbol while still holding down the “Fn” key.
- Release both keys and check if the keyboard is now unlocked.
Update or reinstall keyboard drivers
If the previous methods didn’t unlock your keyboard, outdated or corrupted keyboard drivers may be causing the issue.
Updating or reinstalling the keyboard drivers can help resolve this problem. Follow these steps to update or reinstall your keyboard drivers:
- Visit the official Dell website and go to the “Support” section.
- Enter your Dell laptop’s model number to find the appropriate drivers for your specific model.
- Download the latest keyboard drivers for your laptop.
- Once the drivers are downloaded, locate the file and double-click on it to start the installation process.
- Follow the on-screen instructions to update or reinstall the keyboard drivers.
- Restart your laptop and check if the keyboard is now unlocked.
Adjust keyboard settings in Windows 10
If all else fails, you can try adjusting the keyboard settings in Windows 10 to unlock your keyboard. Here’s how:
- Click on the “Start” button and select “Settings” from the menu.
- In the Settings window, click on “Devices”.
- From the left-hand side menu, select “Typing”.
- Scroll down and locate the section labeled “Advanced keyboard settings”.
- Click on “Advanced keyboard settings”.
- In the Advanced keyboard settings window, toggle the switch under “Override the keyboard layout” to “Off”.
- Close the Settings window and check if the keyboard is now unlocked.
By following these simple steps, you should be able to unlock your keyboard on your Dell laptop running Windows 10. If the problem persists, you may need to contact Dell customer support for further assistance. Happy typing!
Additional Tips To Prevent Keyboard Lock
While learning how to unlock the keyboard on your Dell laptop running Windows 10 is important, taking preventative measures to avoid keyboard lock is equally vital.
By following these additional tips, you can minimize the chances of encountering this frustrating issue in the future.
Enable or Disable Keyboard Shortcuts
Keyboard shortcuts can be handy for quickly accessing certain functions on your Dell laptop. However, it’s crucial to be mindful of inadvertently pressing key combinations that might lead to the keyboard getting locked.
To prevent this, you can enable or disable keyboard shortcuts by following these steps:
- Access the “Ease of Access Center” by pressing the
Windowskey andUsimultaneously. - Select “Make the keyboard easier to use” to open the corresponding settings.
- Under the “Control the mouse with the keyboard” section, choose either “Turn on Mouse Keys” or “Turn off Mouse Keys” based on your preference.
- Click on “Apply” and then “OK” to save the changes you made.
Regularly Clean the Keyboard
A cluttered or dirty keyboard can result in keys becoming stuck or unresponsive, which may lead to a keyboard lock. It’s important to keep your Dell laptop’s keyboard clean and free from debris. Here’s how you can do it:
- Turn off your laptop and disconnect the power source.
- Gently tilt your laptop upside down to allow any loose particles to fall out.
- Use a small, soft brush or compressed air to remove dust and debris from between the keys.
- Dampen a lint-free cloth with a mild computer-safe cleaning solution and wipe the keys and keyboard surface gently.
- Allow the keyboard to air dry completely before turning on your laptop.
Use an External Keyboard as an Alternative
If you frequently encounter keyboard lock issues on your Dell laptop, using an external keyboard can be a temporary workaround.
Connecting an external keyboard will allow you to continue using your laptop without the inconvenience of a locked keyboard. Here’s how you can set it up:
- Ensure your laptop is powered off.
- Connect the USB cable of the external keyboard to an available USB port on your Dell laptop.
- Power on your laptop and wait for it to recognize the external keyboard.
- Once the external keyboard is detected, you can start using it alongside your laptop’s built-in keyboard.
Conclusion
Unlocking the keyboard on your Dell laptop running Windows 10 is essential to restore productivity and ensure seamless typing performance.
By following the troubleshooting steps outlined in this guide, you will be able to resolve the keyboard lock issue and get back to work in no time.
Recap of the troubleshooting steps
Let’s quickly recap the steps you should take to unlock your Dell laptop keyboard:
- Start by checking if the keyboard is physically locked by looking for any switches or buttons on your laptop that may be limiting its functionality.
- If there are no physical locks, proceed to check the keyboard settings in the Windows Control Panel. Ensure that the keyboard is enabled and not disabled.
- Next, update your keyboard drivers by going to the Device Manager and selecting the keyboard driver. Choose the option to update the driver and follow the on-screen instructions.
- If updating the driver doesn’t work, try uninstalling the keyboard driver and then restarting your laptop. The driver should be automatically reinstalled upon restart.
- In case the issue persists, perform a system restore to revert your laptop’s settings to a previous working state.
- Finally, if none of the above steps have resolved the keyboard lock issue, you may need to consider contacting Dell support for further assistance.
Importance of maintaining a functioning keyboard for productivity
A functioning keyboard is crucial for productivity in various aspects of our digital lives. Whether you are working on important documents, browsing the internet, or simply communicating with others, a responsive and reliable keyboard is essential. Here’s why:
- Efficient typing: A functioning keyboard allows you to type quickly and accurately, helping you complete tasks in less time.
- Reduced frustration: When the keyboard is locked or unresponsive, it can be incredibly frustrating and disrupt your workflow. Maintaining a functioning keyboard helps you avoid unnecessary stress and annoyance.
- Enhanced communication: Whether it’s writing emails, chatting with friends, or participating in online discussions, a functional keyboard ensures smooth and effective communication.
- Improved multitasking: With a responsive keyboard, you can effortlessly switch between applications, perform keyboard shortcuts, and efficiently handle multiple tasks simultaneously.
- Optimized workflow: A functioning keyboard allows you to work seamlessly, boosting your overall efficiency and productivity.
By following the troubleshooting steps outlined in this guide, and understanding the importance of maintaining a functioning keyboard, you can ensure a smooth and uninterrupted user experience on your Dell laptop.
Unlocking the keyboard not only resolves the immediate issue but also contributes to a more productive and enjoyable computing environment.

Credit: keys.direct
FAQs For How To Unlock Keyboard On Dell Laptop Windows 10
How Do I Unlock My Dell Laptop Keyboard?
To unlock your Dell laptop keyboard, press the “Num Lock” key or “Fn” key along with the “F11” or “F12” key.
How Do You Unlock A Locked Laptop Keyboard?
To unlock a locked laptop keyboard, try pressing the “Num Lock” or “Scroll Lock” key or restarting your computer.
Why Is My Dell Keyboard Not Working?
Your Dell keyboard may not be working due to a faulty connection or outdated drivers.
Is There A Button That Locks The Keyboard?
Yes, there is a button to lock the keyboard.
Conclusion
To conclude, unlocking the keyboard on your Dell laptop running Windows 10 is a straightforward process that can quickly resolve any keyboard-related issues you may encounter.
By following the steps mentioned above, you can easily regain control of your keyboard and continue using your laptop without any hindrance.
Remember to start by checking for any physical obstructions, such as dust or dirt, and then proceed to troubleshoot through device settings and software updates.
In case these methods fail, consulting Dell support or seeking professional assistance might be necessary.
Regularly performing maintenance will also help prevent keyboard issues in the future. With these simple yet effective methods, you can ensure a smooth typing experience on your Dell laptop and maximize your productivity.